My site has been moved!

You should be automatically redirected in 6 seconds. If not, visit
http://www.hackagenius.co.cc
and update your bookmarks.


Save Website As your Desktop Background

Posted by smit sanghvi Tuesday, December 1, 2009 0 comments

Want to set any website as your desktop background,just follows the simple steps

Step 1:
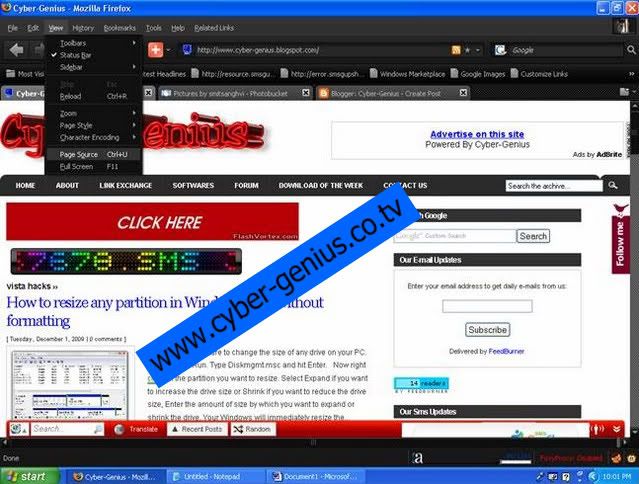
Go to the website you want to make (note-This post will be explained with www.cyber-genius.co.tv)


Select the button view,page source

Step 2:

Then copy the page source

Step 3:
Then paste it into notepad 

Step 4:
Then Save it in desktop as your name.htm

Step 5:
Then Go to your desktop and right click and go to properties


Step 6:
Then after clicking on properties,click desktop and browse

Step 7:After clicking on browse,click on the cyber-genius.htm


Step 8:Click open and then apply the setting.


After it the thing will look like this


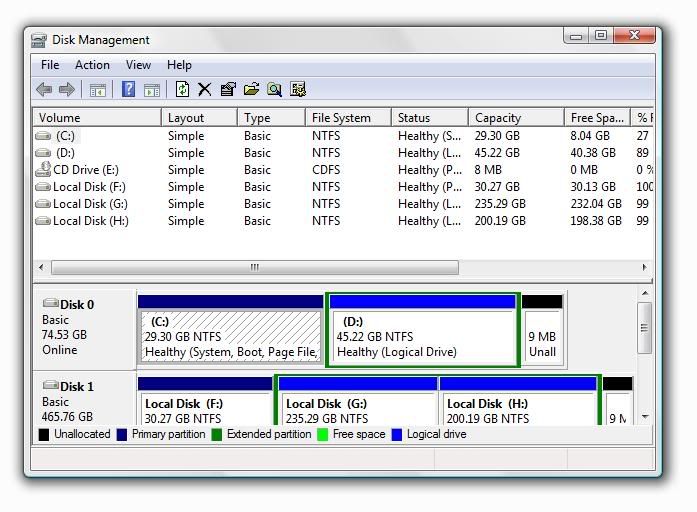
Here is the procedure to change the size of any drive on your PC.


  • Go to Start-> Run. Type Diskmgmt.msc and hit Enter.
  •  

  • Now right click on the partition you want to resize. Select Expand if you want to increase the drive size or Shrink if you want to reduce the drive size,
  • Enter the amount of size by which you want to expand or shrink the drive. Your Windows will immediately resize the partition for you

If you use the built-in file encryption in Windows 7 or Vista, you might be interested in adding an option to the right-click menu to more easily encrypt and decrypt your files, rather than having to use the file properties dialog.

Adding this to the menu couldn’t be simpler – there’s only a single registry key to add.
Open up regedit.exe through the start menu search box, and then find the following registry key:
HKEY_CURRENT_USER\Software\Microsoft\Windows\CurrentVersion\Explorer\Advanced
image
In the right-hand pane, create a new 32-bit DWORD value called EncryptionContextMenuand give it a value of 1.
Now when you right-click on a file, you’ll see a new option called Encrypt.
image
When you choose this option, you’ll receive the following dialog, asking if you want to encrypt just the file, or also the parent folder. You can also choose just the file as the default.
image
Once the files are encrypted, you’ll notice that the title of the file is now green, indicating that it’s been encrypted. The right-click option will also now change to Decrypt.
image
Definitely much simpler… makes me wonder why this wasn’t a built-in option.

Download (Registry Entry)

You would not expect it to be easy to create a backdoor logon.  Indeed, the technique described on this page does not threaten Vista security, unless someone has a Trojan horse program to prepare the way.  Whatever you make of this technique, you have to smile at Microsoft’s unintended meaning of ‘Ease of access’.

Windows Vista Backdoor logon
You might have seen this..

How the Vista Backdoor Logon Works

This back door method exploits the ‘Ease of Access’ menu at the bottom of a regular Windows Vista Logon.  Normally, if you click the Icon then you get a choice of help from Narrator, Magnifier and High Contrast.  The trick is to replace the file called Magnify.exe, with a file which is really cmd.exe.
Once you make the change, then when you select Magnifier from the Ease of Access dialog box, you enter the operating system at the command prompt.  The result is you can logon as the System account, without the need of a password.  One limitation is that your shell program is cmd.exe rather than explorer.  A more serious limitation is that in order to enter via this backdoor, you would need to install a Trojan horse program.  Another possibility is that you have logged on previously, and manually made the changes described below.
Rename Magnify backdoor logon

Mission to Create an Impostor instead of Magnify.exe

The idea is to change the programme names so that the hyperlink link called ‘Make items on the screen larger (Magnify)’, actually points to cmd.exe.  The result is that you open a back door logon to Vista.

Preliminary Step – Deal with Permissions

Problem: You cannot rename or delete the original Magnify.exe in Windows \system32.  Even though you are an administrator, even though UAC is enabled, all you get is this message:
‘You need permission to perform this action’
Solution: Take ownership of the file Magnify.exe, then change the permission for the Administrator’s group to Full control.  Then rename Maginify.exe to MagnifyOld.exe.
Vista Take Ownership Windows\system32


Main Step – Create the Impostor Magnify.exe

  1. Create a new folder called Ease
  2. Copy CMD.exe —> \Ease \cmd.exe
  3. Rename \Ease \cmd.exe —> Magnify.exe
  4. Copy \Ease \Magnify.exe —> Windows \system32\Magnify.exe
What you have achieved is that the old, relatively harmless, ‘Magnify’ becomes the more versatile cmd.exe.

Test Your ‘Ease of access’ Backdoor MethodVista Backdoor logon - Ease of access

  1. At the Vista Logon screen, click on Ease of access
  2. Check the box next to: Make Items on the screen Larger (Magnifier)
  3. Click ‘OK’
  4. You should now find yourself at the Command Prompt
  5. Try whoami  (System account)
  6. Try regedit

One of the new changes in Windows 7 and Vista is that each user has a “Home” directory that is actually accessible and meant to be used. In XP and 2k, you had a hidden home directory that you weren’t meant to muck around in.

Some of the new features, like the Downloads directory, are only accessible through your Home directory, which is why it makes sense to put an icon for it right on the desktop.
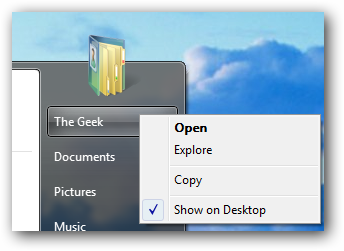
To do this, click the Start button, and then right click on your User name. Choose the Show on Desktop option:


Alternate Method

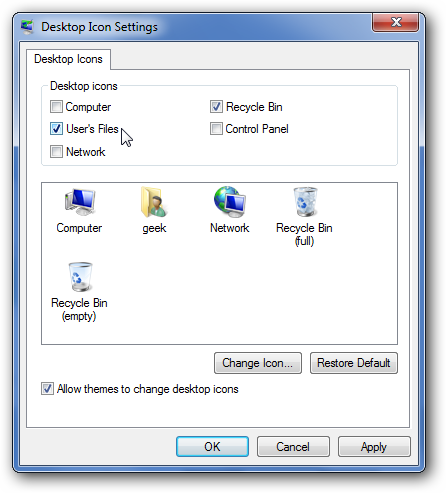
You can also right-click on the desktop, choose Personalize from the menu, and then Desktop Icons on the left-hand pane.
From this screen, you can simply check the box for user’s files to add the icon to the desktop.


It's not possible to increase ur memory size but u can compress ur data to save ur disk space, this feature is available in NTFS drive..
Compresing data in NTFS
* open my computer
* select any drive(drive with NTFS format)
* right click and select properties
* click on general tab
* select “compress drive to save disk space”
* Apply and OK
ur data will remain safe…

Step 1: Browse to the Registry Key
The first thing you’ll want to do is open up regedit.exe through the start menu search or run box, and then browse down to the following key:

HKEY_CLASSES_ROOT\Directory\Background\shell
image
The screen should look similar to this one if you are in the right place.
Step 2: Create the Menu Item Key Name
To complete this step we’ll need to create a new key, the name of which is exactly what is going to show up on the desktop menu.
Right-click on the “shell” key, and then choose New \ Key from the menu.
image
Give the new key the name that you want to show up on the desktop context menu. For this example we’ll be using Notepad.
image
Optional Step: If you want to assign an “Alt” key to this menu entry for quicker access, you can change the (Default) value on the right and put an & character in front of the key you want to use. For instance, if you wanted to be able to just use the N key to launch Notepad once the desktop context menu pops up, you can do this:
image
Personally I don’t find this terribly useful since you have to use the mouse to right-click on the desktop… may as well just use the mouse to click the item. Still, for completeness I’ve included it.
Step 3: Create the Command Key
Next you’ll need to create the command key that will actually hold the command used to launch the application. Right-click on the new Notepad key, and then choose New \ Key from the menu.
image
Give this key the name “command” in lowercase.
image
Step 4: Add in the Full Application Executable Path
To complete this step you’ll need the full path to the application that you want to launch. You can use Shift + Right-Click to get the Copy as Path menu item to find this more quickly.
image
Now click on “command” on the left side, and then double-click on the (Default) key in the right side to edit the string value.
image
Paste in the full path to the executable that you got from the “Copy as Path” step above, or you can put in the full path yourself if you’d like.
Once it’s done, it should look like this:
image
And right-clicking on the desktop will produce the new menu item… naturally, using this menu item should launch Notepad.


image
You can add as many applications to the desktop context menu as you’d like, just repeat the steps 2-4 again with a new menu item name.

Normally when you want to access the Disk Cleanup tool, you usually have to either find it through the start menu, or open up the drive properties window. Instead of going through all that, we can use a simple registry hack to add a menu item to the drive right-click menu.
Using the Hack
After installation, you can simply right-click on a drive and choose “Disk Cleanup” from the menu:
image
If you are using Windows Vista, you’ll be asked whether you want to clean up your files or all files…
image
And then disk cleanup will begin:
image
Manual Registry Hack
Open up regedit through the start menu search or run box, and then browse down to the following key:
HKEY_CLASSES_ROOT\Drive\shell
image
Create a new key called “diskcleanup” and set the default value to “Disk Cleanup”. Then create another key underneath it called “command” and set the value to the following:
cleanmgr.exe /d %1
The change should be immediate, just right-click on the drive and you should see the new menu item.
Downloadable Registry Hack
Simply download, extract, and double-click on DiskCleanupDriveMenu.reg to enter the information into the registry. You can use the included RemoveDiskCleanupDriveMenu.reg file to reverse the changes.

Download (Registry Entry)

USB Disk Ejector

Posted by smit sanghvi 0 comments

Using USB Disk Ejector from the GUI

This utility is really quite slick… launch it and then either double-click or press enter on the usb device you’d like to eject. There’s literally nothing else to it.
image
If you assign a hotkey to the executable through a shortcut, you can operate the entire thing from your keyboard. Quite useful for keyboard ninjas!
Using From the Command Line (Advanced)
You can also use the utility from the command line, and pass parameters to tell it which drive to eject. It will work silently by default, so there won’t be any popups to deal with.
You can start off by passing in the /? parameter to show the help dialog:
image
Now that you know the command line options, you can test them out… for instance, my flash drive is mounted as my G: drive, so I’d use this syntax:
usb_disk_eject /removeletter G
image
You will only get a message if there is an error. For instance, if you run the same command a second time without the USB drive mounted, you’ll get this message that doesn’t seem very accurate:
image
You can also use the partial name matching if your USB drive seems to change letters a lot, but the syntax is slightly strange. To check for a partial name, append * to the beginning of a keyword. Do Not put a second asterisk in the search string, as it won’t work.
For instance, the full name of my flash drive is “Memorex TRAVELDRIVE 005B” so I could use the full name:
usb_disk_eject /removename “Memorex TRAVELDRIVE 005B”
Or I could just use *Memorex as the name instead:
usb_disk_eject /removename “*Memorex”
Note: the /showeject parameter didn’t work for me at all under Vista, but it might work for you.
Create a Shortcut to Eject a Specific USB Drive
Now that we know how the syntax works, we can include that into a shortcut that can be launched from an icon or hotkey. Right-click on the desktop or elsewhere and choose New \ Shortcut.
image
In the location box, you’ll put the full path to the USB Disk Eject application file, and then append the /removeletter parameter to the end including the drive letter.
C:\path-to\USB_Disk_Eject.exe /REMOVELETTER G
image
You’ll want to give the shortcut a reasonable name, and then you’ll have an icon you can use to immediately eject the drive:
image
Note that you could use the /removename parameter instead if you choose.
Assign a Hotkey to the Shortcut
Now that we have a shortcut, we can assign a hotkey to the shortcut by right-clicking on the icon and choosing Properties. On the Shortcut tab you’ll see a place to assign the Shortcut key:
image
Add in the shortcut key and close the dialog. As long as the shortcut is on your desktop you shouldn’t have to restart anything for the hotkey to work. You can also move the shortcut to another folder, for instance your quick launch bar.


Download USB Disk Ejector from mixnmojo.com

It's always struck me as odd that system tweakers use the registry editor all the time to fix annoyances in Windows, but nobody has created a tweak to add the registry editor to the control panel… until now.

I’ve created a registry hack to add the registry editor as another option in the Control Panel in either Vista or XP.
Usage in Windows Vista
After installation you’ll need to choose System and Maintenance in the control panel.
image
And you’ll see the new Registry Editor item at the bottom of the list:
image
Perhaps most useful, it’s now available through the start menu search box.
image
Usage in Windows XP
After installation you’ll see the new icon in Control Panel if you choose the classic view.
image
Installation
Just extract and double-click on the installation script. You can remove using the included removal script.

Download Registry Entry

If  you find yourself using the Group Policy Editor all the time, you might have wondered why it doesn’t show up in the Control Panel along with all the other tools. After many hours of registry hacking, I’ve come up with a registry tweak to let you do just that.

You can’t manually make the registry tweak yourself using regedit.exe because there’s no way to add a default item of type REG_EXPAND_SZ, but I’ve provided a registry hack download for you.
Please note that this does not work with the Home editions of either Vista or XP because they don’t come with Group Policy Editor.
Windows Vista
After installation, you will find the new item by first choosing Additional Options in Control Panel.
image
You should now see Group Policy Editor in the list.
image
Windows XP
You will have to switch to the Classic View in order to see the icon in XP.
image
And now it will show up in the list of icons.
image
Installation
Just download and extract and double-click on AddGroupPolicyToControlPanel.reg to add the icon. There is also another registry script that will remove the items.

Download

Have you ever noticed that the File Types option was completely removed from Vista, and there’s no built-in way to change the editor for many file types? Sure, you can change the default application used to open the file, but you can’t change what happens when you right-click / edit.

You can either directly hack the registry, or there’s a freeware utility that adds the functionality back… we’ll show you how to do both methods.
image
Using the Registry Hack Method
Open up regedit.exe through the start menu search or run box, and then browse down to the following key:
HKEY_CLASSES_ROOT\batfile\shell\edit\command
image
Double-click on the (Default) key to open it up, and then replace the path for notepad with the full path for your preferred editor, making sure to leave a space and then the %1 at the end (which inserts the current file name into the path)
Using the Easy Method
Using the freeware and open-source Types utility, you can easily change file types… just find the “bat” extension in the list, or filter by the “batfile” class, then open up the properties. You can easily replace the editor by just using the yellow icon next to the drop-down and choosing your preferred editor.

image
Of course, you can use this application to change the default editor for any file type, not just batch files.


DOWNLOAD TYPES


There may come a day that optical drives are as hard to find as 5.25 floppy drives are today.WinToFlash is a software for transfer your Windows XP, Windows 2003, Windows Vista, Windows 2008, Windows 7 setup from CD or DVD to USB in some mouse clicks. This is about you can install your Windows from flash drive, USB pen, HDD, etc to your computer or netbook.And this is not all it can do. WinToFlash can transfer your live CD or DVD to USB card, for example, BartPE. After all you can erase your USB media and format it with Windows for every day use.WinToFlash starts a wizard that will help pull over the contents of a windows installation CD or DVD and prep the USB drive to become a bootable replacement for the optical drive.So that You don’t have to worry about scratches on the disc or misplacing your original media discs once you transfer their contents to the flash drive. The optical drive is quickly becoming a thing of the past, especially in office environments, as media is shifted to the cloud.
Functions list

Windows XP/2003/Vista/2008/7 to USB transfer

WinPE to USB transfer

USB media erasing, full of quick

Create the drive with emergecy bootloader
System requirements

To use Novicorp WinToFlash, your computer has to meet certain hardware requirements. Actual requirements vary, depending on the system configuration and the programs and features that you choose.

Pentium 233-megahertz (MHz) processor or faster

At least 64 megabytes (MB) of RAM

At least 10 megabytes (MB) of available space on the hard disk

Keyboard and a Microsoft Mouse or some other compatible pointing device

Video adapter and monitor with Super VGA (800 x 600) or higher resolution

Windows XP/2003/Vista/2008

                                                   DOWNLOAD

Visit our new website

Our Newsletter

Enter your email address To Subscribe Us Via Email:

Our SMS Updates